-
Posted on: 07 Jan 2026
-
Connecting your beloved VCR to a modern Dish Network system might seem like a challenge, but it's entirely achievable. This guide will walk you through the necessary steps, ensuring you can once again enjoy your VHS tapes or record programs with your classic setup. We'll cover the essential connections, potential issues, and the required equipment for a seamless integration in 2025-26.
Understanding Your Equipment: VCR and Dish Network Receiver
Before diving into the connection process, it's crucial to understand the capabilities and limitations of both your VCR and your Dish Network receiver. This foundational knowledge will make the subsequent steps much clearer and help you anticipate potential compatibility issues. In 2025-26, while VCRs are considered legacy technology, many households still possess them, and the desire to connect them to modern entertainment systems persists.
Your VCR: The Analog Workhorse
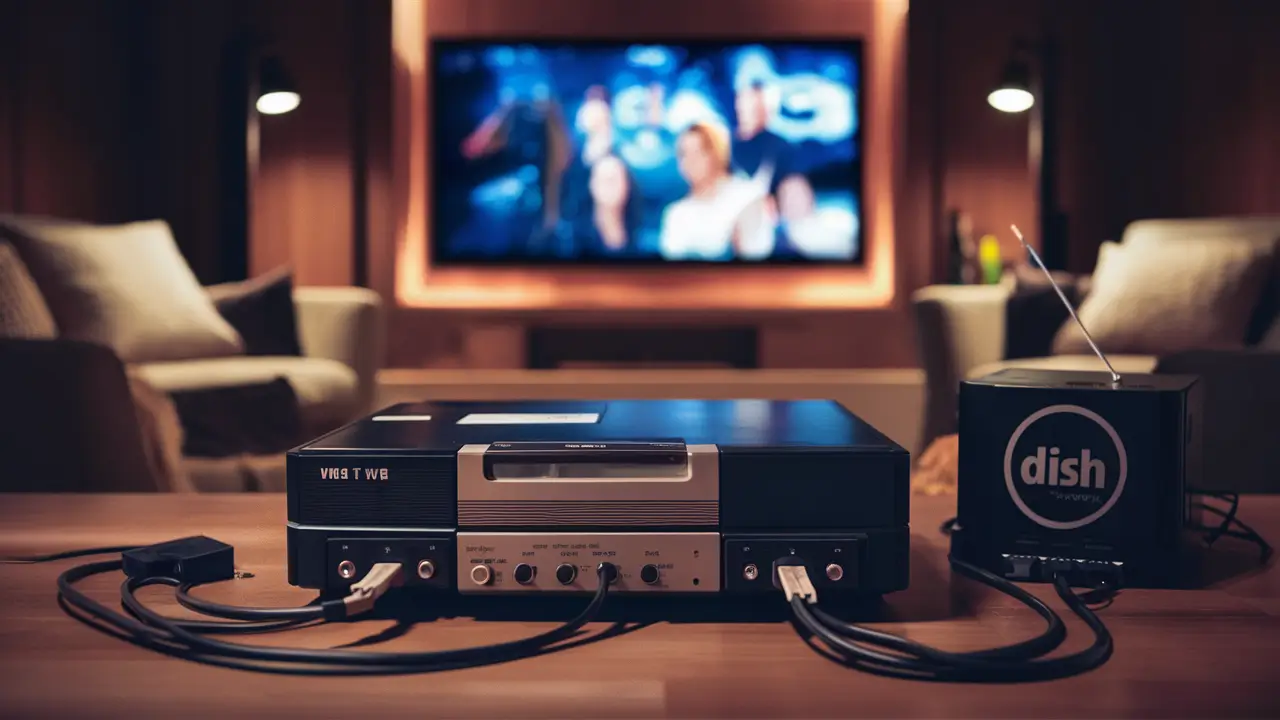
VCRs, or Video Cassette Recorders, operate on analog technology. They typically feature a set of input and output ports designed for analog audio and video signals. The most common connectors you'll find on a VCR are:
- RF Coaxial Input/Output (Coax): This is the older, less common method for connecting devices. It transmits both audio and video over a single cable, but with significantly lower quality compared to other methods. Many VCRs will have an "Antenna In" or "RF In" and an "Antenna Out" or "RF Out" port.
- Composite Video (RCA Jacks): This is the most prevalent connection type for VCRs. You'll see three RCA jacks: one yellow for video, and two for stereo audio (red for right channel, white for left channel). These are often labeled "Video Out," "Audio Out," and sometimes "Video In," "Audio In" if the VCR can record from external sources.
- S-Video: Some higher-end VCRs might feature an S-Video port. This separates the luminance (brightness) and chrominance (color) signals, offering a slightly better video quality than composite, but it still requires separate audio connections.
The primary function of your VCR in this setup will likely be either playback of VHS tapes or, less commonly, recording programs from an external source. Understanding which ports are available on your specific VCR model is the first critical step.
Your Dish Network Receiver: The Digital Hub
Dish Network receivers, also known as set-top boxes or DVRs (Digital Video Recorders), are modern digital devices. They are designed to receive digital satellite signals and output them to your television. In 2025-26, most Dish receivers are equipped with digital output ports. The relevant ports for connecting to a VCR are typically:
- HDMI (High-Definition Multimedia Interface): This is the standard digital connection for modern TVs and receivers. It carries both high-definition video and audio. However, HDMI is a digital-only signal and cannot directly connect to the analog inputs of a VCR.
- Composite Video (RCA Jacks): Many Dish receivers, especially older models or those designed with broader compatibility in mind, still include composite RCA outputs (yellow for video, red and white for audio). This is the key to connecting to your VCR.
- RF Coaxial Output: Some receivers might have an RF coaxial output, but this is less common for video output to external devices and more for passing a signal to other RF devices. Its quality is generally inferior.
- Component Video (YPbPr): These are three RCA jacks (red, green, blue) for video and separate red and white for audio. This offers higher quality than composite but is still analog. It's less likely to be directly useful for a VCR unless you have a very specific adapter setup.
The critical takeaway here is that your Dish receiver needs to have an analog output, most likely composite RCA jacks, to directly interface with your VCR's analog inputs.
Assessing Compatibility
The success of your connection hinges on the output ports available on your Dish Network receiver and the input ports on your VCR. In 2025-26, many newer Dish receivers are phasing out analog outputs in favor of HDMI-only. If your Dish receiver only has HDMI, you will need an adapter, which we will discuss later.
Actionable Step: Identify the output ports on your Dish Network receiver and the input ports on your VCR. Take pictures if you're unsure. This will dictate the cables and potential adapters you need.
Essential Cables and Adapters You'll Need
The type of cables and adapters required depends entirely on the available ports on your Dish Network receiver and your VCR. For 2025-26, we'll focus on the most common scenarios.
Scenario 1: Direct Composite Connection (Most Common)
This is the ideal scenario and requires the fewest additional components. If your Dish Network receiver has composite RCA outputs (yellow, red, white) and your VCR has corresponding composite RCA inputs, you'll need:
- A 3-RCA to 3-RCA Cable: This cable has a male RCA connector on each end for each of the three signals (yellow, red, white). Ensure the cable is of decent quality to minimize signal degradation.
Example: A cable like this is readily available online and in electronics stores for under $10 in 2025-26.
Scenario 2: HDMI Output from Dish Receiver to VCR (Requires Adapter)
If your Dish Network receiver only has an HDMI output, you cannot directly connect it to your VCR's analog inputs. You will need a converter:
- HDMI to Composite RCA Converter Box: This is an electronic device that takes the digital HDMI signal and converts it into an analog composite video and audio signal. These converters typically require a power source (often via USB or a wall adapter) and will have RCA output jacks (yellow, red, white) and an HDMI input.
- HDMI Cable: You'll need a standard HDMI cable to connect the Dish receiver to the converter.
- 3-RCA to 3-RCA Cable: To connect the converter box to your VCR.
Note on Quality: These converters vary in quality. Cheaper models might introduce lag or degrade the signal more noticeably. For 2025-26, research reviews before purchasing to find a reliable converter.
Scenario 3: Using RF Coaxial (Least Recommended)
If both your Dish receiver and VCR have RF coaxial outputs/inputs, you could technically connect them this way. However, the video and audio quality will be significantly degraded, making it the least desirable option for 2025-26.
- RF Coaxial Cable (RG6 or RG59): You'll need a coaxial cable with F-type connectors on each end.
This method is generally only considered if no other analog output options are available.
Other Potential Adapters (Less Common)
While less common for this specific connection, you might encounter situations requiring:
- Component to Composite Adapter: If your Dish receiver has component outputs but no composite, and your VCR only has composite inputs. This is a more complex conversion and might require a powered converter.
- SCART Adapters: If you are in a region that uses SCART connectors, you might need SCART-to-RCA adapters.
Summary Table of Cable Needs
The following table outlines the most probable cable requirements based on your Dish receiver's output and your VCR's input.
Dish Receiver Output VCR Input Required Cable(s)/Adapter Notes Composite RCA (Yellow, Red, White) Composite RCA (Yellow, Red, White) 1 x 3-RCA to 3-RCA Cable Direct connection, best analog quality. HDMI Composite RCA (Yellow, Red, White) 1 x HDMI to Composite Converter, 1 x HDMI Cable, 1 x 3-RCA to 3-RCA Cable Requires a powered converter. Digital to analog conversion. HDMI HDMI (Not applicable for VCR) N/A Cannot directly connect to VCR. RF Coaxial RF Coaxial 1 x RF Coaxial Cable Lowest quality, use only if no other options exist. Recommendation for 2025-26: Prioritize the composite RCA connection if available. If not, invest in a reputable HDMI to Composite converter.
Step-by-Step Connection Guide
Now that you've identified your equipment and gathered the necessary cables, let's walk through the connection process. We'll cover the two most common scenarios: direct composite connection and using an HDMI to composite converter.
Scenario A: Direct Composite Connection (Dish Receiver with RCA Out to VCR with RCA In)
This is the most straightforward method. Ensure both your Dish receiver and VCR are powered off before you begin connecting cables.
Step 1: Connect the Video Cable
Take your 3-RCA to 3-RCA cable. Locate the yellow RCA jack labeled "Video Out" on your Dish Network receiver. Connect one end of the yellow RCA cable to this port. Now, locate the yellow RCA jack labeled "Video In" on your VCR. Connect the other end of the yellow RCA cable to this port.
Step 2: Connect the Audio Cables
Next, connect the audio cables. On your Dish Network receiver, locate the red and white RCA jacks labeled "Audio Out" (or similar). Connect the red RCA plug to the red "Audio Out" jack on the receiver and the white RCA plug to the white "Audio Out" jack on the receiver. Then, on your VCR, locate the corresponding red and white RCA jacks labeled "Audio In" (or similar). Connect the other end of the red cable to the red "Audio In" jack on the VCR, and the other end of the white cable to the white "Audio In" jack on the VCR.
Step 3: Power On and Select Inputs
Once all cables are securely connected, power on your Dish Network receiver first, followed by your VCR, and then your television. On your television's remote control, use the "Input" or "Source" button to cycle through the available inputs until you select the one corresponding to the VCR's input. This might be labeled "AV," "Video," "Input 1," or similar, depending on your TV model.
Step 4: Configure VCR and Dish Receiver
On your VCR, you may need to set the input source to "Line In" or "AV" to receive the signal from the Dish receiver. Consult your VCR's manual if unsure. On your Dish receiver, you may need to adjust settings to ensure it's outputting analog composite signals if it has multiple output options. Some receivers might automatically detect or require manual selection.
Step 5: Test Playback or Recording
You should now see the output from your Dish Network receiver on your television through the VCR's input. If you are playing a VHS tape, insert it into the VCR and press play. If you intend to record, select the program on your Dish receiver and press record on your VCR. You might need to set your VCR to "Channel 3" or "Channel 4" if using an RF modulator, but with composite, this is typically not required.
Scenario B: HDMI to Composite Converter (Dish Receiver with HDMI Out to VCR with RCA In)
This scenario involves an extra device, the converter box. Ensure the converter box is powered.
Step 1: Connect HDMI Cable from Dish Receiver to Converter
Take your HDMI cable. Connect one end to the HDMI "Out" port on your Dish Network receiver. Connect the other end to the HDMI "In" port on your HDMI to Composite converter box.
Step 2: Connect Composite Cables from Converter to VCR
Take your 3-RCA to 3-RCA cable. Locate the composite "Video Out" (yellow), "Audio Out" (red and white) jacks on your HDMI to Composite converter box. Connect the yellow RCA plug to the yellow "Video In" jack on your VCR. Connect the red RCA plug to the red "Audio In" jack on your VCR. Connect the white RCA plug to the white "Audio In" jack on your VCR.
Step 3: Power On and Select Inputs
Power on your Dish Network receiver, the HDMI to Composite converter (ensure it has power), your VCR, and your television. On your television's remote, select the input that corresponds to your VCR's RCA inputs (e.g., "AV," "Video").
Step 4: Configure Converter and VCR
Some HDMI to Composite converters have a switch to select between NTSC (North America) and PAL (Europe) video standards. Ensure it's set to NTSC for North American Dish Network signals. On your VCR, set the input to "Line In" or "AV."
Step 5: Test Playback or Recording
You should now see the output from your Dish receiver displayed on your TV via the VCR. Test playback of a VHS tape or attempt a recording. For recording, ensure your VCR is set to the correct input source. For example, if you're recording a program from the Dish receiver, you'll need to set your VCR to "Line In" or "AV" and then press record on the VCR while the program is playing on the Dish receiver.
Important Considerations for 2025-26
- Signal Quality: Converting digital HDMI to analog composite will always result in some loss of quality. Expect standard definition resolution at best.
- Lag: Some converters may introduce a slight delay (lag) between the audio and video, which can be noticeable during fast-paced content.
- Power Requirements: Powered converters are generally more reliable than passive ones.
- VCR Recording Limitations: If you're using your VCR to record, remember that it will record the signal as it's received from the Dish box at its native analog resolution. You won't be recording in HD.
Tip: Always refer to the user manuals for your specific Dish Network receiver and VCR models for detailed instructions on input selection and settings.
Troubleshooting Common Issues
Even with careful setup, you might encounter problems. Here are some common issues and their solutions, relevant for 2025-26 when integrating older and newer technology.
No Picture or Sound
- Check Cable Connections: Ensure all RCA cables are firmly seated in their respective ports. A loose connection is the most frequent culprit. Verify that the colors match (yellow to yellow, red to red, white to white).
- Verify Input Selection: Double-check that your TV is set to the correct input (e.g., AV1, Video). Then, ensure your VCR is set to the correct input source (e.g., Line In, AV).
- Dish Receiver Output: Confirm that your Dish receiver is actually outputting a signal. Try connecting the receiver directly to your TV via HDMI to ensure it's functioning.
- Converter Power: If using an HDMI to Composite converter, ensure it is powered on and has an indicator light lit.
- Converter Settings: If your converter has an NTSC/PAL switch, ensure it's set to NTSC for North American broadcasts.
- VCR Functionality: Test your VCR by playing a known working VHS tape to confirm it's operational.
Poor Picture Quality (Fuzzy, Distorted, Black and White)
- Cable Quality: Older or damaged RCA cables can degrade signal quality. Try using a different, higher-quality cable.
- Composite vs. HDMI: Remember that composite video is an analog, standard-definition signal. It will never look as sharp as an HDMI signal. If you're seeing significant degradation, it might be due to the inherent limitations of composite or a faulty converter.
- RF Interference: Ensure your cables are not running near power cords or other sources of electromagnetic interference.
- VCR Tracking: If the issue is primarily when playing tapes, your VCR's tracking might need adjustment. Most VCRs have a "Tracking" control.
- Dish Receiver Settings: While less common, some Dish receivers might have settings for analog output resolution. Ensure it's set to the highest possible standard definition if available.
No Sound, or Sound Only from One Channel
- Audio Cable Connections: Ensure the red and white RCA audio cables are securely connected to the correct "Audio Out" on the source (Dish receiver or converter) and "Audio In" on the VCR.
- VCR Audio Input Setting: Confirm your VCR is set to receive audio from the external input source.
- Dish Receiver Audio Output: Check your Dish receiver's audio settings to ensure it's outputting stereo sound.
Recording Issues (VCR Won't Record)
- Input Source Selection: The most common reason for recording failure is incorrect input selection on the VCR. Ensure it's set to "Line In" or "AV" when you press record.
- VCR Timer/Programming: If you're trying to time-shift record, ensure the VCR's timer functions are set correctly. Consult your VCR manual.
- Signal Passthrough: If you're using a converter, ensure the converter itself is functioning correctly and passing the signal through.
- VCR Tape Issues: Try a different VHS tape, as the tape itself might be damaged or locked from recording.
Dish Receiver Not Outputting Analog Signal
This is increasingly common in 2025-26 as manufacturers phase out analog outputs.
- Check Receiver Settings: Some Dish receivers allow you to enable or disable analog outputs in their settings menu. Consult your Dish Network manual or customer support.
- Model Specifics: Older Dish receiver models are more likely to have analog outputs. Newer models often rely solely on HDMI. If your receiver lacks analog outputs, an HDMI to Composite converter is your only viable option.
Table of Common VCR/Dish Network Connection Issues
Symptom Likely Cause Solution No Picture/Sound Loose cables, incorrect input selection Secure all connections, verify TV and VCR inputs. Fuzzy Picture Low-quality cables, analog limitations Use better cables, understand composite limits. Black and White Picture Incorrect cable setup (e.g., only video connected), faulty cable Ensure all three RCA cables (yellow, red, white) are connected correctly. No Audio Audio cables disconnected or incorrect Check red and white audio cable connections. Recording Fails Incorrect VCR input source, tape issue Set VCR to "Line In" or "AV," try a different tape. Dish Receiver Lacks RCA Out Modern receiver design Use an HDMI to Composite converter. Pro Tip for 2025-26: Keep your VCR and Dish Network receiver manuals handy. They are invaluable resources for specific settings and troubleshooting steps unique to your models.
Alternatives and Future-Proofing Your Media
While connecting a VCR to Dish Network is possible, it's important to acknowledge the limitations of analog technology in today's digital world. In 2025-26, embracing digital solutions offers superior quality, convenience, and longevity for your media.
The Limitations of VCRs and Analog Connections
As discussed, analog signals, especially composite, are susceptible to interference and degradation. The resolution is limited to standard definition (typically 480i), which pales in comparison to the HD and 4K content streamed and recorded today. Furthermore, VHS tapes themselves are prone to wear and tear, and their lifespan is finite. Connecting them to modern systems often involves compromises in quality and introduces complexity.
Modern Alternatives for Recording and Playback
Dish Network itself offers robust solutions for recording and playback:
- Dish DVRs: Your Dish receiver likely has DVR capabilities. This allows you to record programs directly in high definition, store them digitally, and watch them on demand without the need for external analog equipment. Many Dish DVRs offer extensive storage capacity, allowing you to keep recordings for extended periods.
- On-Demand and Streaming Services: Dish Network provides access to a vast library of on-demand content and integrates with popular streaming services. This offers a far more extensive selection of entertainment than what's available on VHS tapes.
For your existing VHS collection, consider these digital alternatives:
- VHS to Digital Conversion Services: Professional services can convert your VHS tapes into digital files (e.g., MP4, MOV). These files can be stored on hard drives, cloud storage, or even burned to DVDs or Blu-rays, preserving your memories in a more durable and accessible format. Many services in 2025-26 offer competitive pricing.
- DIY VHS to Digital Converters: You can purchase relatively inexpensive USB capture devices that connect to your VCR and computer. Software included with these devices allows you to record your VHS tapes digitally. While this requires more effort, it can be a cost-effective solution for large collections.
Why Digitize Your VHS Tapes?
Digitizing your VHS collection offers several advantages:
- Preservation: VHS tapes degrade over time. Digital files, when properly backed up, are much more stable and can be preserved indefinitely.
- Quality: Digital formats offer superior picture and sound quality compared to analog VHS.
- Accessibility: Digital files can be easily played on any modern device – TVs, computers, tablets, and smartphones. You can also share them with family and friends.
- Convenience: No more rewinding, fast-forwarding, or dealing with bulky tapes.
- Space Saving: Digital files take up significantly less physical space than stacks of VHS tapes.
The Future of Media Consumption in 2025-26
The trend is overwhelmingly towards digital. High-definition and ultra-high-definition content, streaming, and digital archiving are the standards. While nostalgia for VCRs is understandable, relying on them as a primary means of recording or playback in 2025-26 is impractical for most users. The effort and potential quality compromises involved in connecting them to modern systems often outweigh the benefits, especially when superior digital alternatives are readily available.
Recommendation: If your primary goal is to watch VHS tapes, consider digitizing them. If your goal is to record programs, leverage the advanced DVR features of your Dish Network receiver. Using a VCR with Dish Network should be viewed as a temporary or niche solution, rather than a long-term strategy for media consumption in 2025-26.
This comprehensive guide has equipped you with the knowledge to connect your VCR to Dish Network, troubleshoot common issues, and understand the modern alternatives available. While the process can be a bit technical, by following these steps, you can successfully bridge the gap between analog and digital entertainment. Remember to prioritize the best possible signal path and, for long-term media preservation, consider digitizing your VHS collection. Enjoy your retro viewing experience!


